SNM Installation Guide
- Prerequisites and Tools
- Win32 Installation
- Linux Installation
- Mac (OS X/Darwin) Installation
- Installing SNM as a Win32 Service
- Installing SNM as a Linux Service
An understanding of xml, ip networking and snmp is assumed.
- Editing Tool:
Komodo is used to develop SNM, hence is recommended if you do not already have a preferred editor. - snmp Query Tool:
Getif for Win32 or net-snmp for Linux are recommended for the snmp querying of devices to assist in determining OIDs, etc.
Hardware and Software Requirements for Installing SNM
- The minimum hardware and software requirements for installing SNM on Windows are:
- A Windows 2000 Workstation, 2000/2003 Server, or Windows XP with:
- a network connection and the Internet Protocol (TCP/IP) installed, also
- IIS Web Service or Apache HTTP Service installed.
Installation Summary
- Download and install Perl 5.8 or 5.10 (Activestate's MSI)
- Download and install RRDtool 1.2.x for Perl
(
..rrdtool\bindings\perl-shared>ppm install RRDs.ppd) - Verify HTML::Template is installed. (
C:\Perl>ppm query HTML-Template)
Install if required (C:\Perl>ppm install HTML-Template) - Verify XML::Simple is installed. (
C:\Perl>ppm query XML-Simple)
Install if required (C:\Perl>ppm install XML-Simple) - If snmp v3 or authentication to the e-mail server is required, refer to optional Perl Modules
- Download, unzip and install SNM (unzip and run
install.pl) - Configure Web Server
Install Perl 5.8 or 5.10
- Download and install Perl 5.8 or 5.10 (ActiveState's MSI is recommended for Win32 installations)
Install RRDtool for Perl (RRDs)
- Download RRDtool-1.2.10 or later (eg: rrdtool-1.2.30-win32-perl510.zip) and unzip into a directory (e.g. C:\rrdtool\)
Note: Currently SNM only supports RRDtool v1.2.10 and above, also Perl 5.8 and 5.10
SNM does not support: RRDtool versions 1.0.xx or 1.3.xx, or Perl 5.6.x.
- Download and install NMAKE.EXE and NMAKE.ERR from http://support.microsoft.com/default.aspx?scid=kb;en-us;Q132084 to C:\perl\bin\
- Install RRDs:
C:\rrdtool>install or C:\rrdtool\rrdtool\bindings\perl-shared>ppm install RRDs.ppdRRD module for activestate perl 5.8.x-------------------------------------====================Install 'RRDs' version 1.201 in ActivePerl 5.8.3.809.====================Installing C:\Perl\site\lib\auto\rrds\rrds.bsInstalling C:\Perl\site\lib\auto\rrds\rrds.dllInstalling C:\Perl\site\lib\auto\rrds\rrds.expInstalling C:\Perl\site\lib\auto\rrds\rrds.libInstalling C:\Perl\site\lib\auto\rrds\rrds.pdbFiles found in blib\arch: installing files in blib\lib intoarchitecture dependent library treeInstalling C:\Perl\site\lib\makefile.plInstalling C:\Perl\site\lib\ntmakefile.plInstalling C:\Perl\site\lib\rrds.pmSuccessfully installed RRDs version 1.201 in ActivePerl 5.8.3.809.Press any key to continue . . .1..7ok 1 loading...Press any key to continue . . .
Install CPAN modules
|
XML::Simple (mandatory) |
ActivePerl usually includes XML::Simple hence installation may not be required. If it is missing and you are on-line, then:
Or, download XML::Simple from CPAN and install as per the README: perl Makefile.PL, nmake, nmake test and nmake install. |
|
HTML::Template (mandatory) |
ActivePerl usually includes HTML::Template hence installation may not be required. If it is missing and you are on-line, then:
Or, download HTML::Template from CPAN and install as per the README: perl Makefile.PL, nmake, nmake test and nmake install. |
|
Time::HiRes (mandatory) |
ActivePerl usually includes Time::HiRes hence installation may not be required. If it is missing and you are on-line, then:
Or, download Time::HiRes from CPAN and install as per the README: perl Makefile.PL, nmake, nmake test and nmake install. |
|
Crypt::DES (optional) |
Crypt-DES is only required if SNMP v3 is used. Crypt-DES is currently not available at ActiveState, hence use the enclosed copy
Or, to unpack and install Crypt::DES:
|
|
Authen::SASL (optional) |
Authen-SASL is only required if authentication to the SMTP e-mail server is required.
Or, to unpack and install Authen::SASL from the enclosed file:
|
|
MIME::Base64 (optional) |
MIME-Base64 is only required if authentication to the SMTP e-mail server is required. MIME-Base64 is currently not available at ActiveState, hence use the enclosed copy
Or, to unpack and install MIME::Base64 from the enclosed file:
|
|
Note: The CPAN modules Net::SNMP, Net::Ping and Net::Syslog are supplied and installed with SNM. Separate installation is not required. |
|
Install SNM
- Download SNM from http://snm.sourceforge.net
- unzip and run
install.pl.
Note: Ensure folders are activated when SNM is unzipped.
Web Server Configuration
- For IIS 5:
- cgi configuration
- Goto Internet Information Services using the MMC: Administrative Tools >> Internet Services Manager
- Right click the 'Default Web Site' >> Properties >> Home Directory >> Configuration...
- Add an Extension '.cgi' if it does not exist, with the following properties:

- In File Manager, create a folder under the web directory, as defined in
<graphfolder> eg: C:\Inetpub\wwwroot\snm\graphs.
- Select, then right click the 'graphfolder' >> Sharing... >> Security
- Enable 'Read' and 'Write' for the user Internet Guest Account
- In Internet Services Manager, select the folder under the web directory,
as defined in <graphfolder> eg: C:\Inetpub\wwwroot\snm\graphs.
- Select, then right click the 'graphfolder' >> Properties >> Directory
- Enable 'Read' and 'Write'

- To stop IIS caching the rrd images (allows the images in browsers to refresh
each 5 minutes)
- Goto Internet Information Services using the MMC: Administrative Tools >> Internet Services Manager
- In the 'Default Web Site', right click the 'snm' folder >> Properties >> HTTP Headers
- Select 'Enable Content Expiration' and 'Expire Immediately'
- cgi configuration
- For IIS 6:
- cgi configuration as per above (IIS 5)
- In File Manager
- Select, then right click the 'graphfolder' >> Properties >> Security
- Allow 'Read' and 'Write' for 'Internet Guest Account'
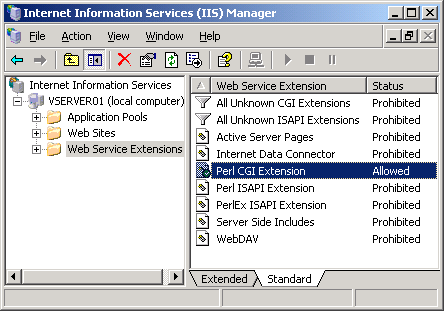
- Web Service Extensions
- Goto Internet Information Services using the MMC: Administrative Tools >> Internet Services Manager
- Select the 'Web Service Extensions'
- Allow 'Perl CGI Extension' (visible after ActivePerl is installed).
Reference: http://support.microsoft.com/default.aspx?scid=kb;en-us;245225
Hint: To increase security an option is to use Perl's taint features. To implement taint, in IIS Configuration... set the Executable to C:\Perl\bin\perl.exe -T %s %s, also change the first line in snm.cgi to #!/usr/bin/perl -Tw.
- For Apache 2:
Refer to the Apache 2 Manual, specifically the "Apache Tutorial: Dynamic Content with CGI" for several methods on configuring Apache for CGI programs. The following is one method:- Add a sub-directory (C:\Program Files\Apache Group\Apache2\snm) and copy the web files to it (snm.cgi, .htmt and .png files)
- In the SNM configuration file (config.xml), set <web_dir> to C:\Program Files\Apache Group\Apache2\snm
- Add an Alias to the Apache configuration file (httpd.conf) which
permits the execution of CGI files:
Alias /snm/ "C:/Program Files/Apache Group/Apache2/snm/"<Directory "C:/Program Files/Apache Group/Apache2/snm">Options Indexes ExecCGIAllowOverride NoneOrder allow,denyAllow from all</Directory> - Add to the Apache configuration file (httpd.conf) a directive
to treat all files with the cgi extension as CGI programs:
AddHandler cgi-script cgi - Ensure the file snm.cgi is associated with Perl Command Line
Interpreter via Windows Explorer:
My Computer >> select snm.cgi >> File >> Properties >> General >> Opens with: Perl Command Line Interpreter,
also ensure Perl is in the path (e.g. from the command console: PATH=C:\Perl\bin\;C:\WINNT\system32;C...) - Change the first line of snm.cgi
from: #!/usr/bin/perl -w
to: #!c:/perl/bin/perl.exe -w
Hint: Only those files needed should be copied to the web directory. Placing additional files in the web directory potentially exposes sources of attack.
Hardware and Software Requirements for Installing SNM
- The minimum hardware and software requirements for installing SNM on Linux are:
- Fedora or Ubuntu Linux (other Linux & BSD distributions should work) with:
- a network connection and the Internet Protocol (TCP/IP) installed, also
- Apache HTTP Service installed and
- Perl 5.8 or 5.10 installed.
Install RRDtool including RRDs
- Download and install RRDtool 1.2.x
for the appropriate Perl build (5.8 or 5.10) using the
build instructions or:
- For RedHat: use rpm installers (e.g. rrdtool - 1.2.23-6.fc7.i386.rpm and rrdtool-perl - 1.2.23-6.fc7.i386.rpm)
- For Ubuntu: sudo apt-get install rrdtool.
Note: Currently SNM only supports RRDtool v1.2.10 and above.
SNM does not support: RRDtool versions 1.0.xx or 1.3.xx.
Install CPAN modules
|
XML::Simple (mandatory) |
|
|
HTML::Template (mandatory) |
|
|
Time::HiRes (mandatory) |
Time-HiRes is usually included in distributions. If not, use rpm, apt-get or CPAN to download and install. |
|
Crypt::DES (optional) |
Crypt-DES is only required if SNMP v3 is used. Use rpm, apt-get or CPAN to download and install. |
|
Authen::SASL (optional) |
Authen-SASL is only required if authentication to the SMTP e-mail server is required. Use rpm, apt-get or CPAN to download and install. |
|
MIME::Base64 (optional) |
MIME-Base64 is only required if authentication to the SMTP e-mail server is required. Use rpm, apt-get or CPAN to download and install. |
|
Note: The CPAN modules Net::SNMP, Net::Ping, Net::DNS and Net::Syslog are supplied and installed with SNM. Separate installation is not required. |
|
Install SNM
- Download SNM from snm.sourceforge.net
- unzip and run
install.pl. - Set permissions for the "apache" group (RedHat) or "www-data" group (Ubuntu):
- read for <web directory>, eg /var/www/html/snm/,
- execute for snm.cgi
- read-write for <rrd folder>, eg /var/www/html/snm/rrd/
- read-write for <graph folder>, eg /var/www/html/snm/graphs/
- read-write for log files snm.log and snm.log.old.
Web Server Configuration
- For Apache (httpd):
- It is recommended to start Apache as a service, refer to redhat-config-service or equivalent
- Ensure mod_perl is loaded e.g. for Ubuntu: sudo aptitude install libapache2-mod-perl2
- Configure Apache to permit CGI execution:
Use the Options directive, inside your Apache server configuration file (/etc/httpd/conf/httpd.conf or /etc/apache2/apache2.conf), to specify that: the server shall treat all files with the cgi extension as CGI programs and CGI execution is permitted in the snm directory:AddHandler cgi-script cgi<Directory /var/www/html/snm>Options ExecCGI</Directory>Refer to the Apache manual for more information.
Hint: Only those files needed should be copied to the web directory. Placing additional files in the web directory potentially exposes sources of attack.
Modifications have been kindly provided to enable SNM to run on Mac OS X / Darwin, refer: SourceForge.net: Open Discussion.
Using the Linux Installation as a base, a summary of changes required to run under OS X 10.4 are:
- In snm.pl and snm.cgi, modify shebang to #!/opt/local/bin/perl
- Modify installation paths (for compatibility with darwinports and OS X Apache)
- snm.pl in /opt/local/bin,
- config files in /opt/local/etc/snm,
- perl modules (Apachestats, etc.) in /opt/local/lib/snm,
- snm.cgi in /Library/WebServer/Documents/snm
- Insert path to perl modules, i.e. in snm.pl and snm.cgi, modify
from:
- use lib qw(/lib/perl/5.8.5/i386-linux-thread-multi); to:
- use lib qw(/lib/perl/5.8.5/i386-linux-thread-multi /opt/local/lib/snm);
Microsoft Resource Kit tools instsrv.exe and srvany.exe are used to setup SNM to run as a service under NT/2K/XP/2K3:
- Open up an MS-DOS command prompt.
Type the following command:
C:\>instsrv SNM C:\WINNT\srvany.exeThe service was successfuly added!...Note1: The service name can be whatever you want, (SNM is recommended).
Note2: To remove the service: C:\>instsrv SNM REMOVE.
Refer to Microsoft's srvany.wri for further details. - Open up the Registry Editor (Start Button >> Run >> type REGEDT32)
Select the key: HKEY_LOCAL_MACHINE\SYSTEM\CurrentControlSet\Services\SNM - From the Edit menu >> Add Key.
Key Name: Parameters
Class :<leave blank> - (Optional) Within the key: HKEY_LOCAL_MACHINE\SYSTEM\CurrentControlSet\Services\SNM
From the Edit menu >> Add Value.
Value Name: Description
Type : REG_SZ
String : System and Network Monitor - Select the key: HKEY_LOCAL_MACHINE\SYSTEM\CurrentControlSet\Services\SNM\Parameters
From the Edit menu >> Add Value (3 times).Value Name Type String Application REG_SZ C:\Perl\bin\wperl.exe AppDirectory REG_SZ C:\Program Files\snm AppParameters REG_SZ snm.pl -c config.xml - Close the Registry Editor
- Open up Services (Administrative Tools >> Services)
Select the service SNM and "Start Service" - To validate SNM is running goto Task Manager... >> Processes and a new
wperl.exe process should be running.
Note: It is strongly recommended that SNM is implemented successfully in a console before attempting to run it as a service.
To install SNM as a service on Linux, two solutions have been developed:
- rc.local, and
- init.d
It is strongly recommended that SNM is implemented successfully in a console before attempting to run it as a service.
rc.local
rc.local is the simplest of the two:
- Login as root.
- In the startup file /etc/rc.d/rc.local, add the line:
/usr/bin/perl /opt/snm/snm.pl -c /etc/opt/snm/config.xml >/dev/null & - Logout and reboot. SNM will start automatically.
- To confirm that SNM has started, from the console: ps -e |grep "perl" will result in "1089 ? 00:00:09 perl" or similar.
init.d
init.d (/etc/init.d/snmd) provides greater flexibility but is more complex:
The snmd script may require modification to suit your environment. The posting of any modifications along with the environment it suits to the snm forum would be greatly appreciated.
- Login as root.
- Add the file snmd to the folder: /etc/init.d/snmd
- give executable permissions to the start up script: chmod +x /etc/init.d/snmd
- For Fedora, add snmd to the list of services: chkconfig --add snmd
- For Ubuntu, create symbolic links, from /etc/init.d/ run: sudo update-rc.d snmd defaults
- The service can then be started, stopped, or restarted:
- service snmd start
- service snmd stop
- service snmd restart
- Logout and reboot. SNM will start automatically, you will also see snmd in the service list and be able to stop and start it.
- To confirm that SNM has started, from the console: ps -e |grep "perl" will result in "1089 ? 00:00:09 perl" or similar.